The Calf Stretch
The Calf Stretch is the corrective exercise we recommend most often here at CEM. Calf Stretch is part of the minimal shoe-friendly Restorative Exercise program, founded by Katy Bowman of Nutritious Movement™.
Calf Stretch is very helpful when you’re transitioning into minimal shoes, and it can contribute to building a better gait pattern and alignment over time.
The Goal of Calf Stretch
Our calf musculature is affected by our movement habits such as sitting for a number of hours each day—that includes commuting, working, relaxing etc.— as well as wearing shoes that elevate your heel. Both of these habits create shortening in the calf muscles which adapt over time to be permanently at that shorter resting length.
When you want to transition to zero drop, minimal shoes, or even barefoot, this requires that musculature to be longer than this adapted length, and the muscles are forced to stretch in order to accommodate this newly desired range of motion.
Muscles can stretch, that’s part of their function, but they shouldn’t have to stretch in order to accommodate a joint that is sitting at neutral. The goal then becomes to restore the muscle to the optimum length so that the joints don’t have this added tension and the muscles can shorten and lengthen appropriately when you do things like walk!

See Katy's blog "Sitting (in heels) is the new smoking" here for the original.
How to Calf Stretch
We sell half domes which are perfect for the Calf Stretch, but if you want to start now, simply use a rolled-up yoga mat, blanket or towel. You can also use natural obstacles like rocks and roots to do this when you are out on a walk or hike.
Instructions for the Calf Stretch can also be found in Katy Bowman’s books, many of which are available here at CEM!
Local Restorative Exercise Specialist Carol Robbins has created a PDF on the Calf Stretch specially for our CEM customers. You can even download and print it for your convenience.
View in higher quality on Google Docs (and print) here.


You can stop right here and try the Calf Stretch using that guide, but if you want to learn more about my personal experience and a deeper dive into the Calf Stretch, read on!
Hannah's Calf Stretch Experience
At CEM we also try to walk the walk, not just talk the talk, so here are my own personal experiences with the Calf Stretch.
While practicing Restorative Exercise with Carol— who also happens to be my mum— as well as taking online courses with Katy and reading her books, I gained both embodied information (feeling changes in my body and how I use it) as well as cognitive information (learning theory and how to put what I was feeling into words) about the Calf Stretch.
I feel that it is important to share what I have learned from these incredible teachers. I once asked Katy how she felt about my walking people through her calf stretch as a relative novice and she replied, “it is more important that people do a calf stretch regularly than that they do it perfectly.” So I’m happy to share what I’ve learned with our community.
Disclaimer: if using the half dome results in a strong sensation of stretch, maybe start with a folded towel or rolled mat, as your calf muscles need to be coaxed gently. When it comes to any kind of movement you choose to engage in, you know your body best. Use common sense and stop if it feels wrong or painful. You can seek out an expert if you feel personal attention would benefit you, especially if you have ongoing or temporary challenges to your movement such as chronic illness or injury.
With that out of the way, here’s a detailed description of how I do the calf stretch.
- Find your bony landmarks
- Foot straight
- Step onto the half dome
- Make adjustments as needed
- Check for tension
- Hang out for a minute or two
- Repeat other side
- Repeat several times a day
Finding the bony landmarks
There are two prominent bones on the outside of each foot that we’ll use to find the set up for this exercise. One is the outside ankle bone. The second is the knuckle of your pinky toe.

Find foot straight position
Stand behind your half dome with your feet hip distance apart. Line up the bony landmarks discovered above on a straight line such as the edge of a yoga mat or the line on a wood floor. Most people find this position to feel like they are turning their feet too far inwards. If you feel off-balance try standing with your feet a little further apart or have a chair or wall nearby to hold onto.
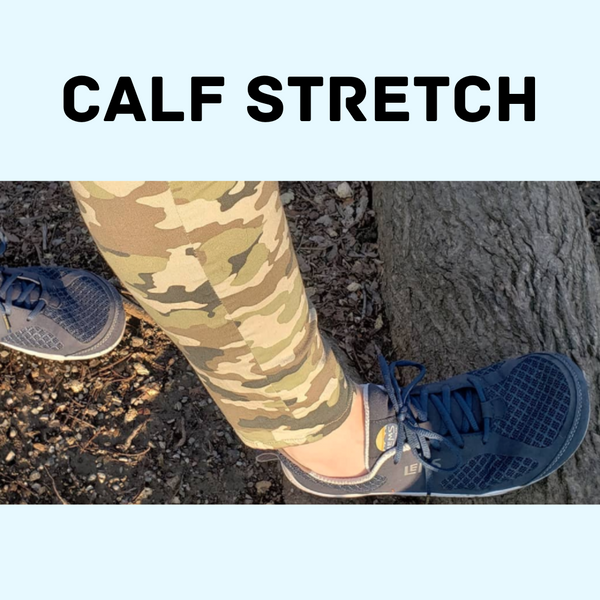
In my head I call Foot Straight "RE parallel," due to my dance training. You can see in the photo below that I used the floor tiles as a reference when lining up my feet.
Step onto the half dome
Place one foot up on the top of the dome, the ball of your foot should be as close to the top as possible. The foot that is still flat on the floor can move forward or back to find a gentle stretch that doesn’t result in a loss of balance or muscles tightening up to keep your balance. You should be relaxed all over.
The goal is not to feel a big stretch or to push yourself, this seems counterintuitive to many of us who have that “no pain, no gain” idea instilled. For this exercise to work well, you need to find that “goldilocks” edge between stretch and relaxed.

Make adjustments if needed
I keep a checklist to refer to. Here are some alignment markers to consider:
- Both feet straight – sometimes the foot on the floor turns out for balance.
- Knees straight – sometimes you will want to take the tension off by bending the knees a bit. If you can’t straighten your knees, try a lower object like a folded towel to start your Calf Stretch.
- Bodyweight centered over your feet. All your weight should not be on one leg or the other but centered as evenly as possible.
- Hips are not twisting, hip bones are both pointing forwards like headlights, same with shoulders.
- Ribs are down, not popping out or lifted.
- Arms hanging by your side.
- Head looking forward (if you have learned the RE Head Ramp you can put it into practice here).
Check for tension
As strange as it sounds, the calf stretch's simple change in the position of the ankle can create tension elsewhere in the body that directly affects the ability of our nervous system to concentrate on the task at hand (or foot, as the case may be!). Therefore, we recommend checking this list for areas of tension:
And here’s my check list for tension markers:
- Relax your quadriceps (muscles on the front of your thigh). You can figure out if they are clenching by using them to hoist and release your kneecap in an up and down motion. You want the down position in the kneecap, so that you could gently wiggle your kneecap side to side with your fingers if you chose to. You may need to step back on the standing leg to do this.
- Let your hard working belly relax, let it all hang out for a few minutes and just exist
- Let your pelvic floor relax, no need to “tuck your tail” either
- Let your hands, jaw, and anywhere else that you personally tend to hold tension relax too
- Take some deep breaths, why not?
Hang out for a minute and then switch sides. As you hang out in the stretch, gently bring your attention up and down your body in a scan for alignment checks and to relax any tension you find.
Why We Prefer This Calf Stretch to Others
There are other ways to “stretch your calves,” and for other goals they might be a better option, but recall our goal here is not really to stretch, but to restore muscle length. Without getting too technical, the difference is in the response of the muscle fibers and the desired outcome. For more on the technical aspects of the calf stretch, check out Move Your DNA.
The Restorative Exercise Calf Stretch is a functional one that mimics our natural gait pattern and is done “closed chain” – i.e. with the foot connected to the ground (or in this case the half dome). It’s also easier to check your alignment markers and tension in this standing position.
We at CEM want to set you up for success in transitioning to your minimal shoe/barefoot goals and we are happy to supply you with all the tools necessary to do so safely and effectively including half domes, books, toe spacers and of course, shoes!
What's Next
Believe it or not this is just the start to what I wanted to write about the calf stretch. There are additional alignment adjustments you can add as you grow more experienced (and more mobile), and there are layers of detail we didn’t delve into here. I hope to write a companion article to this one about those exact things, let us know if you’d like us to prioritize an “Advanced Calf Stretch” piece!
For those just starting their journey with minimal shoes, the next step is adding more tools to your transition toolbox and using those tools day to day. The next tool we recommend adding to your toolbox is Pelvic List. Check it out here on Katy’s newly revamped YouTube channel: Pelvic List video.
Have fun exploring the calf stretch!